Friday, November 14, 2014

"West Side Score-y" Pt. 1: The "Smush Chord"

West Side Score-y

One of my current jobs is as a rehearsal accompanist for a production of Leonard Bernstein's West Side Story. This means I attend rehearsals with the singers/actors/dancers and play whichever piece of music they are working on. And that means that one night I may be teaching pitches for a new song, but on another night, I might be playing an entire dance number so that the dancers can work on their choreography along with live music.

All of this meaning: I have a lot of music to learn, and it's to the benefit of everyone involved that I learn this music very thoroughly. I'm up for the challenge! Part of this thorough learning, on my part, means that I'm analyzing some of the music theory behind Bernstein's music.

Knowing the motifs (recurring musical ideas) and harmonic structures of the music helps a great deal with learning it more efficiently and more thoroughly—at least for me, anyways!

The "Smush Chord"

I'm calling this blog series "West Side Score-y" (A Score Study of West Side Story). Hilarious, I know. This first part addresses what I am calling the "Smush Chord."

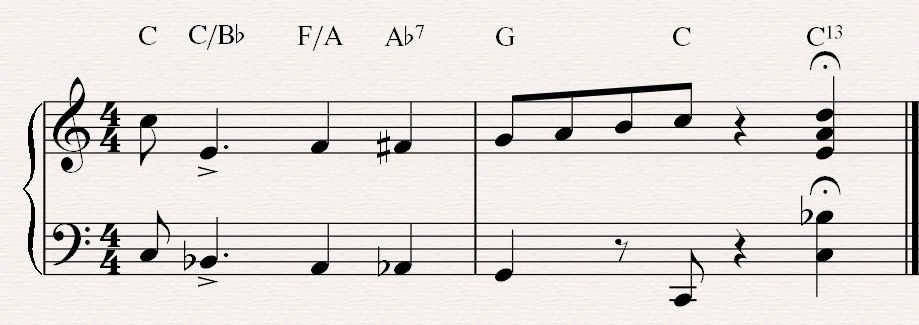
Here's what it looks like on the printed page:

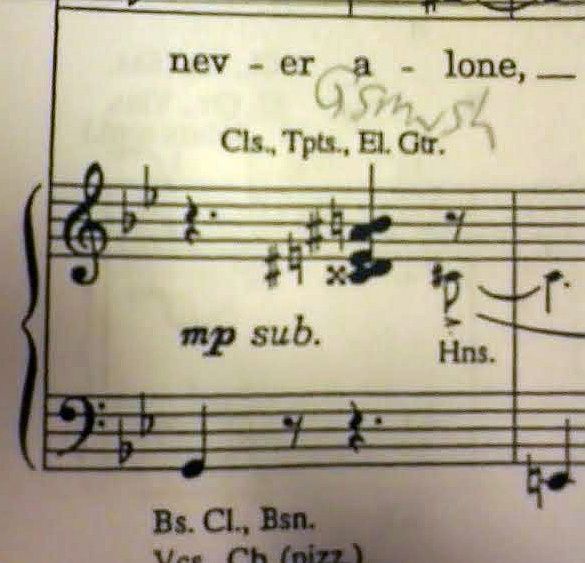
Excerpted from "Jet Song"
As you can see, the chord took a fair amount of black ink to print on the page. It's not a pretty looking thing, nor does it sound pretty.

The visual and aural harshness of the chord is part of what made me want to analyze it a bit deeper and try to wrap my head around it.

(To be honest, sometimes my instinct when seeing a chord like this, is to just smash my hand down onto the keyboard and hope for the best. This more measured, analytical approach is an effort to avoid that tactic.)


Pitch Inventory


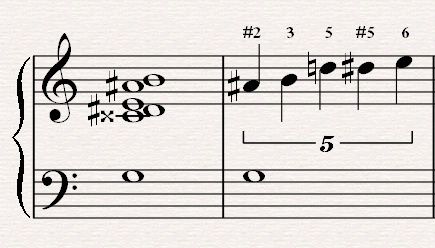
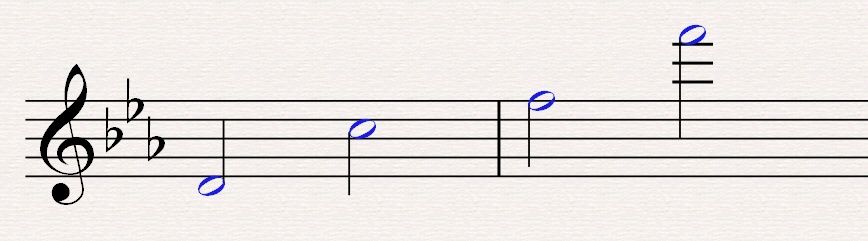
Here's the chord's pitches re-ordered according to ascending (G major) scale order. Above each note, I've attached a scale-degree label, based on the G major scale. I have used some enharmonic spellings in the analysis.

*Notice the tritone (diminished 5th) interval between A# and E. West Side Story is riddled with tritones (Think: "Ma-ri-a").


Major + Minor = Smush

I noticed that the chord's pitches can be divided into two separate groups, one of which forms a Major 6 chord, and the other of which forms a Minor chord (with a flattened 6). Keep in mind, I'm adding the bass note "G" in order to create these chords (indeed, G is the root note).


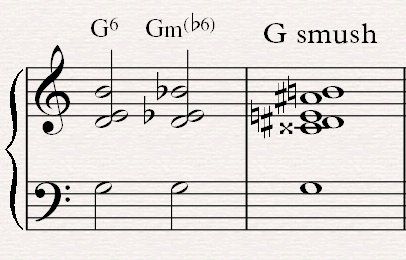
G6 + Gm(b6) = G smush
When these two chords are combined, the result is a clashing of major tonality against minor. And that, ladies and gentlemen, just sounds pretty unattractive to the ear. When I realized that this chord can be thought of as two chords superimposed, my mind leapt to the word "smush," meaning that the minor tones (minor 3rd, minor 6th) are "smushing" against the major tones (major 3rd, perfect 5th, major 6th).


Why?

Why discuss this? Frankly, because it helps. Personally, knowing where the chord tones come from, and how they relate to a familiar tonality helps me wrap my head (and my fingers) around the chord. Furthermore, I knew it was a chord worth exploring because I noticed it shows up at other places throughout the score.

More generally, the half steps (and tritones!) found within this chord are extremely characteristic of Bernstein's intensely chromatic writing throughout the musical. (More on that later.)

Stay tuned for additional installments of "West Side Score-y," which will be created the next time I run into a similarly intriguing musical morsel!

Tuesday, August 26, 2014

"Drop 2" Chord Voicing Technique

The "Drop 2" chord voicing technique is a common arranging/composing/piano trick. It's a great way to voice a chord for a horn section, or if you're a piano player, it's a slick way of creating strong 4- or 5-note voicings.

It's simple:

1) Start with a 4-note chord that exists all within an octave. (This may be a chord in root position, but may also be a different inversion of a chord, or some other type of cluster.)
2) Identify the second highest note (the "2" of "Drop 2").
3) Move this note down an octave.

That's it!

Here's a step-by-step video showing the process:


A Handful of Major Chord Voicings (with colorful illustrations) [Part 2 of 2]

In Part 1 of this series, the handful of major chord voicings was introduced along with an accompanying A/V example.

Now, in Part 2, each voicing will be colorfully broken down.


Color-Coding Chord Tones


I will show each voicing notated on a grand staff, using a color-coded system. In the system, each scale degree (in these case of C major) is assigned a color, following the order of ROYGBIV. Since there are 7 notes in a scale, and 7 distinct colors in the visible light spectrum, this works out nicely. (This colorful choice of mine was inspired by this very interesting article about the link between Music and Color.)

C major scale, in colors.

*Please note that the people I attribute the following voicings to (and therefore the labels I assign each one), are by no means the originators of a particular voicing. Rather, they are the musicians/educators from whom I personally learned each voicing. (I will link to the relevant sources as we go along.)

Five Colorful Voicings


1) Symmetrical "Martin" Cmaj13 (via Peter Martin)

  • Symmetry in intervals: 3rd, 4th, 4th, 4th, 3rd
  • Very similar to the next voicing (Tristano), but more colorful because it contains the 7th
  • LH contains a minor chord in first inversion, RH contains a major chord in second inversion


2) "Tristano" Cmaj6/9 (a la Lennie Tristano)


  • Top four notes are spaced out by a 4th
  • Root is doubled, appearing on the very bottom and top of the voicing
  • Tristano often used this by "planing" this shape, moving it up or down chromatically


3) Rootless "A Position" Quartal Voicing, Cmaj6/9 (via Earl MacDonald)


  • 3rd on bottom (root on top)
  • Basically the same as Tristano's voicing, but without the root doubled in the LH


4) "B Position" Quartal Voicing, Cmaj13 (via Earl Macdonald)


  • 7th on bottom (5th on top)
  • Rootless


5) "Drop 2" Cmaj9


Final Remarks


What to do with all of this information? If you happen to latch on to the sound/feel of one or two of these, take a second to figure it out on the piano. Divide the notes between hands however is most comfortable to you (in some 5-note cases, it may be preferable to put three notes in the LH, two in the RH, but you might prefer it the other way around). From there, continue around the Cycle of Fourths (or Fifths), constructing the voicing slowly and carefully.

Happy voicing!

A Handful of Major Chord Voicings (with colorful illustrations) [Part 1 of 2]

Prepare yourself to play some of these pretty chords. In general, they more-or-less all share the following characteristics:

  • Mostly quartal (stacked in fourths)
  • Contain extensions such as the 6th (13th) or 9th
  • Relatively equal spacing between notes
  • Sound really great
Here they are all together on one line of music, with an accompanying video (listen for the subtle differences between each voicing):

(These labels I assigned each one will be explained in Part 2.)


In the next installment [Part 2 of 2], I will show you how to construct each of these voicings.

Thursday, August 14, 2014

Inverting Intervals

To invert an interval means to move one note (out of the two) up or down by an octave. For example, to invert a 3rd (C and the E above), I can move the C up an octave. This effectively puts the C above the E. So, the new order from lower to higher is E up to C. Furthermore, this creates a different interval: the 3rd became a 6th.

Here's a visual, which matches the style of a previous post on reading intervals from a staff:

When you invert an interval on the staff, its line/space category becomes reversed (same to different, or different to same). Click to enlarge.

You'll see that interval numbers of each inversion pair always add up to 9:
  • A unison inverts to an octave (1+8=9)
  • A 2nd inverts to a 7th (2+7=9)
  • A 3rd inverts to a 6th (3+6=9)
  • A 4th inverts to a 5th (4+5=9)
  • And vice versa

Seeing Intervals on a Staff

When I teach beginner-level piano students, one of the first things they learn is the "step" vs. "skip" concept. This coincides with their introduction to reading music from a staff. If a "line" note goes up to the adjacent "space" note, we call it a step (like stepping up on a flight of stairs). But if that line note goes up to a note on the next line above, we call it a skip (it is skipping the space between the lines). This is often how students begin their understanding of intervals. They soon learn that the line-space example is called a 2nd, and the line-line example is a 3rd.

Beyond 2nds and 3rds, of course, the intervals become larger, and perhaps can be a little trickier to identify on a staff. Fortunately, with a little practice, this becomes easier and easier, until soon enough it is second-nature.

Here's a handwritten sheet showing what different intervals (unisons up to octaves) look like on the staff (5 lines, 4 spaces) The ability to quickly recognize an interval (and eventually, several intervals/chords at once) when reading from written music notation--especially when sight-reading--is very valuable.

I hope my handwriting is legible for you. Click to enlarge.
In quotation marks, I wrote out simple mental steps someone might go through when looking at each interval. Visually, when I see a 7th, I like to imagine climbing up the rungs of a ladder (i.e. going from one line to the line above). On each rung, I can count up by odd numbers: "1, 3, 5, 7." A four-line ladder means I'm looking at a 7th.

The basic nugget of information to take-away from this post is this:

Intervals of Odd Numbers (1, 3, 5, 7) always appear as line-line or space-space.
Intervals of Even Numbers (2, 4, 6, 8) always appear as line-space or space-line.

To help visualize these intervals in another way (pianists especially), it would be a good idea to plunk out each of the intervals depicted above on a keyboard. Begin doing this in the key of C major (all white keys), and when comfortable try out some other keys in order to incorporate black keys into your visual memory bank.

Wednesday, July 16, 2014

Key Signature Calculation (via MusicTheory.net)

Lesson from MusicTheory.net

Recently I found myself in a situation quite common for me: purposelessly browsing musictheory.net and aimlessly clicking through the site's many lessons and exercises (yes, really). One lesson I came across was called Key Signature Calculation, and it explained a handy method of calculating key signatures with minimal rote memorization required.

I have previously written about key signatures in a post where I shared a visual aid (a variation on the standard Circle of Fifths) that can be used to remember the number of sharps or flats in a particular key. This tool covers 12 major keys, and by extension, 12 minor keys. That's a total of 24 keys, and when you account for enharmonic keys, there are actually 30 possible key signatures.

Instead of struggling to memorize all these key signatures, this calculation method can be used with minimal memorization. All the information that must be memorized to use this method is summarized in the following image, which I lifted from musictheory.net:


The Method

The top row of the image shows the seven notes of a C major scale (C, D, E, F, G, A, B) with their respective key-signature-numbers. The absolute value of the numbers refers to the number of sharps (positive) or flats (negative).

The next few bits of information (bottom row) show three possible calculations you can use to get from a key from the top line to a different key not on the top line:
  • Major key to parallel minor: subtract 3  (C major to c minor: 0-3=-3
  • Key to half step lower: subtract 7 (C major to Cb major: 0-7=-7)
  • Key to half step higher: add 7 (C major to C# major: 0+7=7)
The method is simple: apply the appropriate operation (from the image's bottom row) to a (top-row) numeric value.


Application

Once that information is committed to memory, it is now possible to quickly and easily calculate any key signature. Let's practice:


1. Desired key signature: Eb major

  • E's numeric value is 4, then we subtract 7, yielding -3
  • -3 translates to 3 flats (Bb, Eb, Ab). Voila.
2. Desired key signature: G minor

  • G's numeric value is 1 (1 sharp). To get to its parallel minor, subtract 3, yielding -2.
  • -2 translates to 2 flats (Bb, Eb). Boom.
3. Desired key signature: F# major

  • F's numeric value is -1 (1 flat). To go up a half step, add 7, which yields 6.
  • 6 translates to 6 sharps (F#, C#, G#, D#, A#, E#). Piece of cake.

Final Words

That's about it. Commit those seven key-signature-numbers (from the top row of the image) to memory, then either subtract 3 (to get to the key's parallel minor), add 7 (to go up a half step), or subtract 7 (to go down a half step). The resulting number tells you the number of sharps (positive number) or flats (negative number) in your desired key. If you want more key signature information, check out this circle of fifths visual I made.

Thursday, February 20, 2014

Accompanying: 5 Quick Tips

Last weekend I spent a day at a local high school accompanying students at their district Solo & Ensemble Festival, and I spent the dozen-or-so days prior organizing and practicing the music. This year I accompanied for two schools instead of just one (as I have done in the past), so that meant more music to prepare and less time to do so. Keeping the following tips in mind definitely helped me successfully prepare for and participate in the festival this year, even with the time crunch.

For any of you who are at all familiar with S&E (either having had participated as a student musician, director, or accompanist), you'll know how the festival day can get to be rather long, exhausting, and perhaps stressful. Running around trying to make it to your performance sites in time, constantly penciling in time changes on the event schedule, scrambling to grab your instrument and find your accompanist (or in my case, your 'accompanee'), etc. —it can get pretty hectic.

So, in an effort to help any other accompanists out there, here's a list of a few things I've learned through my experiences with events like S&E.

1. Organization is key.

This may seem common-sensical, but it really does make all the difference. Make sure you have all the correct music ahead of time, and label each piece with the student's name and school. If you're working with sheet music, think about arranging the pages in such a way that facilitates easy page turns. On the day of the festival, grab a schedule and arrange your music chronologically by event times.

2. Exude confidence.


Your accompanees will feed off of the energy around them. Keep a positive attitude, and the student musicians will likely follow suit.

3. Roll with the punches; go with the flow.


Scheduling snafus, instrument malfunctions and the like are bound to arise. So prepare yourself for sudden changes in the day's plans, and be flexible.

For example, be prepared to play the Hummel Trumpet Concerto on a keyboard like this:

Media preview
Fortunately, this was just the warm-up piano, and a better (larger) instrument was at the performance site...

4. Make musical choices.


As in any performance, (of course) be musical. But specifically in regard to accompanying (oftentimes reading off of dense orchestral reductions or poor arrangements of pieces), you will find yourself having to make a fair amount of judgment calls, perhaps on-the-fly. E.g. which measures to cut from a score, which melodic line to play, how to re-establish a strong time feel if the performer falls out of time, and so on.

These are all common decisions that you may face throughout a day of accompanying student musicians, so be prepared to make these choices. Whenever possible, talk about these decisions with your accompanee, and make sure you are both on the same page. If faced with an extemporaneous choice, trust your own artistic tastes/ear to guide you, and execute the choice confidently.

5. Power through.


Even if a performance experiences a hiccup or two, keep the music flowing and the time steady. This is again about making 'musical choices.' Above all, keep the heartbeat of the piece alive—it will keep your accompanee engaged in the performance, and the performance will benefit as a result.

Thursday, January 30, 2014

'A' Train Ending

Months ago, I wrote up a little post about the classic "Take the 'A' Train" introduction, so I thought I ought to also write a bit about the tune's equally classic ending (its caboose?).

Here it is (in its most basic form), with some approximations of chord symbols above the staves:

Key of C Major. (click to enlarge)

The ending's coolness,  I think, is a result of its simplicity (and its smooth contrary motion).

With some inferential chord labeling, you end up with strong structural chords (I, IV, and V). There's even a bit of augmented sixth chord action in there! (The Ab7 can be analyzed as a German chord, which I wrote about in this earlier post.)

The final fermata chord is somewhat variable, and it's where you can have fun adding in more interesting colors (my go-to is the #11 extension). Even the chord-quality can be modified, if you so desire (e.g. playing a C major-seventh chord rather than a C dominant-seventh chord).

This two-bar ending is a great thing to memorize and learn in all 12 keys, as it is very commonly used to end songs other than 'A' Train itself. (If someone instructs you to end a tune with the 'A' Train ending, this is what they're referring to.)

And that's about it... Have fun with the "caboose"!

Thursday, January 9, 2014

Dissecting an Oscar Peterson lick ("Night and Day")

Last semester, I was in a "Jazz Improv" course, which taught improvisation through the study of standard melodic devices, idiomatic scales, and listening/transcription projects. For one transcription assignment, I chose an Oscar Peterson solo on the song "Night and Day." I chose O.P. because I love how he develops ideas and structures solos, all with with his signature touch and impeccable sense of time.

A word on transcription

Transcription can be useful for finding lines that you like and integrating them into your own vocabulary, verbatim. But what I like to do, rather than memorize and regurgitate a line exactly, is to identify lines that sound good to me, and then really dissect them and try to figure out why they sound good. (Maybe it's the rhythm that I like, or maybe it's the contour of the melodic line, or maybe it's the use of space, etc.)

And after listening to plenty of solos from my favorite players, over time, I start to see the 'common denominators' —what sorts of musical qualities tend to resonate with me?

From there, I can work on integrating those qualities (not necessarily the exact line verbatim) into my playing. That way, my style is influenced and informed by my musical role models, but my playing is still unique and 'my own.'

The lick

So let's get back to Oscar Peterson and look at just a couple measures from the "Night and Day" solo (click to enlarge):

Original O.P. lick, with target notes in blue.
After spending some time analyzing the line, I took an inventory of the passage's most obvious characteristics:
  • Static harmony (it all occurs over one chord, Ebmaj7)
  • Rhythmic repetition (two eighth notes, four sixteenth notes)
  • Contour of line: large leaps up, sprinkled with small movements down (like taking three steps up a staircase, one step down, three more steps up, another down, etc.)
  • Enclosure
Enclosure and embellishment

Let's focus in on the last bullet point: enclosure. To do so, I'm going to sort of reverse-engineer the line so that we can understand exactly how the enclosure is working. This process is essentially a Schenkerian method of analysis. (Heinrich Schenker said that a piece of music can be reduced down to its most basic elements, and from this structural base, a composer 'composes out' (Auskomponierung) by way of elaboration and embellishment.)

First, we can reduce the whole line into four structural half notes (highlighted in blue, Fig. 1).

Figure 1: Structural 'target' notes.
From there, you can think of the other notes as embellishments of these primary notes, achieved by way of approaching the target note. A common way to approach (precede) a note is through enclosure: playing the notes just above and below the target note.

I have notated this concept in Fig. 2, with slightly condensed rhythmic activity (flattening the first measure into all eighth notes). It works by using two "above" notes and one "below" note to connect beat 1 with the target note on beat 3.

This idea from beats 1-2 is sequenced (repeated up a fourth) on beats 3-4, and it is this repetition that gives the line a sense of structure. The second measure introduces a new connective idea, an ascending Eb major 7 arpeggio up to the F.

Figure 2: Simplified line, with 3-note approaches to target notes (labelled in bar 1).
To get from Fig. 2 (condensed version) to O.P.'s actual line, we add a little bit more embellishment to beats 2 and 4 of the first measure. This is done by adding 'upper neighboring tones,' achieved by increasing the rhythmic activity from eighth notes to sixteenths. (For example, on beat 2, we change Db - B [eighths] to Db - D - Db - B [sixteenths]. The 'D' in this case would be the upper neighbor).

And... voila! We arrive at the original lick (finally!).

The takeaway

Of course all of this analysis is rather long-winded and perhaps reeks of academic stuffiness. Surely, while playing his solo, Oscar Peterson wasn't consciously thinking, "Okay, that was a structural note... now let's connect it to beat 3 with a three-note enclosure. Oh, that sounded nice; let me do that again, this time up a fourth..." (Well, maybe he was...)

The point of this all, then, is to identify and analyze techniques and devices, and 'shed' them in the practice room. Work on them to the point that you no longer need to think through all those theoretical steps. In other words, master the technique; internalize it.

For instance, from these couple measures, I would hone in on the idea of enclosure, and I'd try to figure out how to apply it to my own playing. (I might start by looking at a standard jazz head and identifying a melody note as my target note. Then, I could practice enclosing that target note.)

This is just one way to begin applying a new concept. The point is to think of creative ways to apply new ideas, and to practice the techniques until a level of familiarity/comfort is reached.

Once you really own an idea, it's yours, and you will then gain insight into how you might apply the idea in other contexts, and how you might adapt the idea to meet new musical challenges. (And that's a lot of fun.)
Related Posts Plugin for WordPress, Blogger...