Since stumbling on his work (via YouTube), I have been a huge fan of Max Keenlyside. It was refreshing to see/hear such dedicated, focused work from someone, and I was struck by his wide range of musical skills. For more about Max, head over to his site and read his bio & certainly listen to his compositions.
For those reasons and more, I knew Mr. Keenlyside would be a fantastic way to start my new series of interviews. Without further ado, enjoy this first Artist Spotlight...

Showing posts with label Piano. Show all posts
Showing posts with label Piano. Show all posts
Wednesday, January 18, 2017

Sunday, October 9, 2016
"Benedict" Break-Down: A Closer Look at My Egg-Inspired Invention
"Benedict" is the third movement of my Egg Suite for solo piano.
Here's the piece's description from the Egg Suite music book's preface:
And that's what you can find in this piece! Furthermore, in terms of form, I structured it basically as an A-B-A' form: It contains an Exposition (Section A), Development (Section B), and a Recapitulation (A'). More on that later.
So, let's take a look at the piece, in excruciating detail. (Brace yourselves... ) Here we go!
Note: For all images, click them to enlarge.
This second chunk adds rhythmic interest in a couple ways: it includes smaller (i.e. quicker) note values—sixteenth notes, and each of its smaller rhythmic cells (1/16th, 1/16th, 1/8th, 1/8th) adds up to 1 and 1/2 beats. Since this is the case, a succession of these rhythmic cells effectively alternates which part of the beat gets the sixteenth notes. Yay, syncopation!
Side-by-side, I really liked how these two chunks (a) and (b) played off of each other. So, that meant I had a Subject (Figure 1) which I was happy with! Happy enough to write a whole invention... which brings us to the Countersubject:
The Countersubject, shown below with blue labels, enters while the subject is repeated in the lower voice.
As I did with the subject, I will break the countersubject into two chunks, for analysis' sake: (c) and (d).
(c) spans a wide interval (a nice contrast to the small thirds and seconds happening in the subject), and contains a longer note value—the dotted quarter note (a nice rhythmic contrast to the shorter eighth-note rhythms in the subject)
(d) includes some sixteenth notes, which I liked because that allowed for the subject and countersubject to connect on some sixteenth-note rhythms from time to time. For example, on the fourth beat of Figure 2's first measure.
As you can see, coming up with an effective countersubject often has to do with contrast, playing off of what is happening in the subject. In general, when there are quicker, shorter rhythms happening in the subject, I tried to use slower, longer rhythms in the countersubject. That way, when the two happen simultaneously, the two voices are distinct from each other, and each can be clearly picked out, aurally-speaking, by the listener.
Now that the subject and countersubject have been stated, we continue by expanding on the motives to build on the exposition. Again, I'm keeping in mind the contrasts we established earlier—so I'm sure to pair subject material with countersubject material. In this exposition section, you can see that the motivic material isn't always perfectly imitated. For example, the leap of (c') is sometimes a 5th, other times a 6th. What is usually maintained is the overall shape and rhythm of the motives.
From there, let's skip ahead a little bit, to measure 13.
By this point in the piece, I have modulated to B major (hence the A#'s). This is a 5th higher than the original E major. Also happening here, labeled in green in Figure 4, is the addition of a third voice. Since there's already so much going on with the subject and countersubject, I made sure to keep (e) comparatively simple (i.e. less busy): quarter notes and half notes.
You'll notice in these examples that the subject doesn't always occur in the higher voice (right hand), and the countersubject doesn't always occur in the lower voice (bass clef)—and vice versa. That's characteristic of this compositional style: each voice imitates the other, so the melodic ideas are frequently passed between voices (and voices may even cross, occasionally, like in measure 14).
In the Exposition, I stated the main musical ideas: the Subject and the Countersubject. In terms of key centers, we had the 'home' key of E major, and then modulated up a fifth to the key of B major—a closely-related key. In this next section, the development, we...well, develop those ideas and take them to more distantly-related keys.
Figure 6 shows how one simple idea can be sequenced to create a longer, more exciting passage. Here, the fragment used is the G# - F# - G# sixteenth note idea, which appears first in (b). A fourth sixteenth note is tacked on to those three, then this four-note idea is repeated three more times, each time a step lower than before. This constitutes a sequence.
Skipping ahead a bit more, we arrive at measure 30 (Figure 7). Typically at the tail end of a development section, a device known as dominant prolongation is often employed, in which the dominant (the V chord) is prolonged for several measures, preparing for a return to the tonic (I).
And that's precisely what I did! Since I would be returning to the key of E major, the chord I prolonged was a B7sus. The lower voice adds rhythmic interest by playing the syncopated (b) material, which also foreshadows the imminent return of that motif...
That means we get to hear the E-G#-G# motif as it was originally stated in the subject at the very beginning of the piece, as well as the countersubject. Additionally, I included the newer, third voice. Doing this helped create a real sense of development for the piece: it didn't have this third voice at the beginning, but along the way it went through a transformation, and now it contains this third voice.
(By the way, Bach might have called this a sinfonia now that it has three voices instead of the typical invention's two voices.)
Here's the piece's description from the Egg Suite music book's preface:
'III. We’re skipping past sunny-side-up and plunging into poached territory. A difficult dish [Eggs Benedict], requiring patience and precision, brought to my mind the poise, regality, and even snobbishness of royalty. Let’s call him King Benedict. A quasi-invention, built off of a subject which begins with “E, G#, G#,” seems to capture the stately nature of the king.'As mentioned (well, alluded to) in that blurb, "Benedict" is a Bach-like, baroque style invention of sorts. Basically, that means it features a main musical idea (subject), a complementary idea (countersubject), and imitative counterpoint to develop those subject and countersubject motives.
And that's what you can find in this piece! Furthermore, in terms of form, I structured it basically as an A-B-A' form: It contains an Exposition (Section A), Development (Section B), and a Recapitulation (A'). More on that later.
So, let's take a look at the piece, in excruciating detail. (Brace yourselves... ) Here we go!
Note: For all images, click them to enlarge.
The Exposition (Section A)
To kick off the thing, I (for obvious reasons) had to begin with the E-G-G motif (technically E-G#-G#). This first chunk of the subject (a) has a straightforward rhythm: three pairs of slur-staccato eighth notes. To break up that pattern, I injected some syncopation into the melody, as seen in (b).
 |
| Figure 1: The Subject (a + b) |
This second chunk adds rhythmic interest in a couple ways: it includes smaller (i.e. quicker) note values—sixteenth notes, and each of its smaller rhythmic cells (1/16th, 1/16th, 1/8th, 1/8th) adds up to 1 and 1/2 beats. Since this is the case, a succession of these rhythmic cells effectively alternates which part of the beat gets the sixteenth notes. Yay, syncopation!
Side-by-side, I really liked how these two chunks (a) and (b) played off of each other. So, that meant I had a Subject (Figure 1) which I was happy with! Happy enough to write a whole invention... which brings us to the Countersubject:
The Countersubject, shown below with blue labels, enters while the subject is repeated in the lower voice.
 |
| Figure 2: The Countersubject (c + d) |
As I did with the subject, I will break the countersubject into two chunks, for analysis' sake: (c) and (d).
(c) spans a wide interval (a nice contrast to the small thirds and seconds happening in the subject), and contains a longer note value—the dotted quarter note (a nice rhythmic contrast to the shorter eighth-note rhythms in the subject)
(d) includes some sixteenth notes, which I liked because that allowed for the subject and countersubject to connect on some sixteenth-note rhythms from time to time. For example, on the fourth beat of Figure 2's first measure.
As you can see, coming up with an effective countersubject often has to do with contrast, playing off of what is happening in the subject. In general, when there are quicker, shorter rhythms happening in the subject, I tried to use slower, longer rhythms in the countersubject. That way, when the two happen simultaneously, the two voices are distinct from each other, and each can be clearly picked out, aurally-speaking, by the listener.
Now that the subject and countersubject have been stated, we continue by expanding on the motives to build on the exposition. Again, I'm keeping in mind the contrasts we established earlier—so I'm sure to pair subject material with countersubject material. In this exposition section, you can see that the motivic material isn't always perfectly imitated. For example, the leap of (c') is sometimes a 5th, other times a 6th. What is usually maintained is the overall shape and rhythm of the motives.
 |
| Figure 3: Exposition continues with imitation. |
From there, let's skip ahead a little bit, to measure 13.
By this point in the piece, I have modulated to B major (hence the A#'s). This is a 5th higher than the original E major. Also happening here, labeled in green in Figure 4, is the addition of a third voice. Since there's already so much going on with the subject and countersubject, I made sure to keep (e) comparatively simple (i.e. less busy): quarter notes and half notes.
 |
| Figure 4: Subject and Countersubject transposed up a fifth (Key of B Major), with new, third voice (e) |
You'll notice in these examples that the subject doesn't always occur in the higher voice (right hand), and the countersubject doesn't always occur in the lower voice (bass clef)—and vice versa. That's characteristic of this compositional style: each voice imitates the other, so the melodic ideas are frequently passed between voices (and voices may even cross, occasionally, like in measure 14).
Are you still with me? Good! Let's develop these ideas...
The Development (Section B)
In the Exposition, I stated the main musical ideas: the Subject and the Countersubject. In terms of key centers, we had the 'home' key of E major, and then modulated up a fifth to the key of B major—a closely-related key. In this next section, the development, we...well, develop those ideas and take them to more distantly-related keys.
 |
| Figure 5. |
In Figure 5, notice the upper voice's rhythm—borrowed from (b), but with a different, more chromatic melody. The lower voice plays with (a) and uses a couple counterpoint techniques to change it: inversion and augmentation.
The inversion isn't perfect, though: Instead of going up a 3rd then going down a 2nd, I went down a 6th then up a 2nd. That is to say, I flipped (inverted) the direction of the intervals, but the intervals themselves were not maintained.
Also at work is augmentation, lengthening the original rhythm. Where the subject's original rhythm contained eighth notes, this augmented (i.e. elongated) left hand line instead uses quarter notes, providing a solid foundation on top of which the more active right hand can take place.
 |
| Figure 6. |
 |
| Figure 7: One bar from the dominant prolongation section. |
And that's precisely what I did! Since I would be returning to the key of E major, the chord I prolonged was a B7sus. The lower voice adds rhythmic interest by playing the syncopated (b) material, which also foreshadows the imminent return of that motif...
The Recapitulation (Section A')
After all that harmonic turmoil, fragmentation/manipulation of the motives, and overall tomfoolery, we're ready to return to the original subject and countersubject, and in the original key, to boot.
 |
| Figure 8: Re-united and it feels so good. |
That means we get to hear the E-G#-G# motif as it was originally stated in the subject at the very beginning of the piece, as well as the countersubject. Additionally, I included the newer, third voice. Doing this helped create a real sense of development for the piece: it didn't have this third voice at the beginning, but along the way it went through a transformation, and now it contains this third voice.
(By the way, Bach might have called this a sinfonia now that it has three voices instead of the typical invention's two voices.)
Conclusion (Codetta)
In terms of this piece, the conclusion is comprised of a tiny codetta, which jams as many E-G#-G# statements as I could fit in a small space. I'll refrain from sharing a Figure 9 to show that, because I think we have had enough images for this post.
In terms of this blog post, the conclusion is perhaps best accomplished by showing the sum of all these parts. Enjoy watching and listening to "Benedict," the third movement of the Egg Suite:
The scores of all five movements of "The Egg Suite" are available here (PDF).
Monday, September 12, 2016
Sus7 Chromatic Climb
Here's a little chromatic thing I stumbled upon one day at the piano. I like it because you get the smoothness of chromaticism (obviously), but also variety via slightly different chords.
The chords here alternate between a sus-7-with-9th and a sus-7-without-9th.

That 9th or 7th in the top voice in itself creates a satisfying shape and is a nice contrast to the straightforward half-step climb in the lower voices.
Here it is with the voices separated, which makes it easier to notice some of the intervallic relationships between each voice. In this image, I described each voice's movement and made note of each voice's relationship to the bass.


That 9th or 7th in the top voice in itself creates a satisfying shape and is a nice contrast to the straightforward half-step climb in the lower voices.
Here it is with the voices separated, which makes it easier to notice some of the intervallic relationships between each voice. In this image, I described each voice's movement and made note of each voice's relationship to the bass.

Monday, September 14, 2015
Dominant inner-voice shift
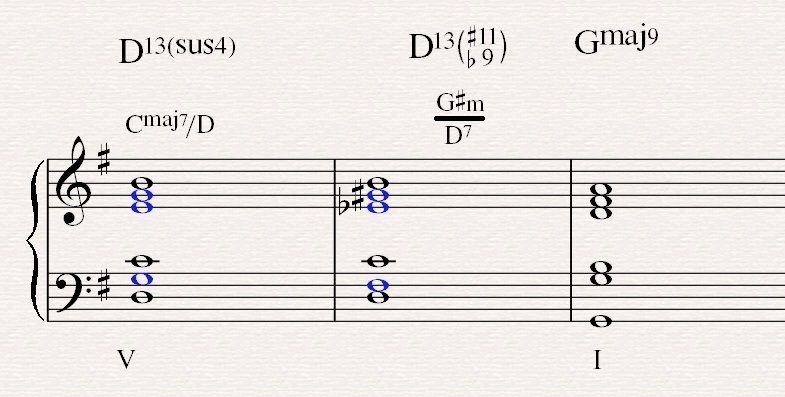 |
| Voices in blue are the ones that move. Notice that the outsides of the chord stay put, while the inner voices make small changes. |
Here's a way to add some extra crunch to a dominant chord, with the 13th on the top.
A few reasons I like this harmonic shift:
- It all happens in the middle of the voicing. The outter voices stay put.
- The shifts are small (half steps), but the harmonic effect is big.
- The top two shifting voices in the right hand move in contrary motion, which is great.
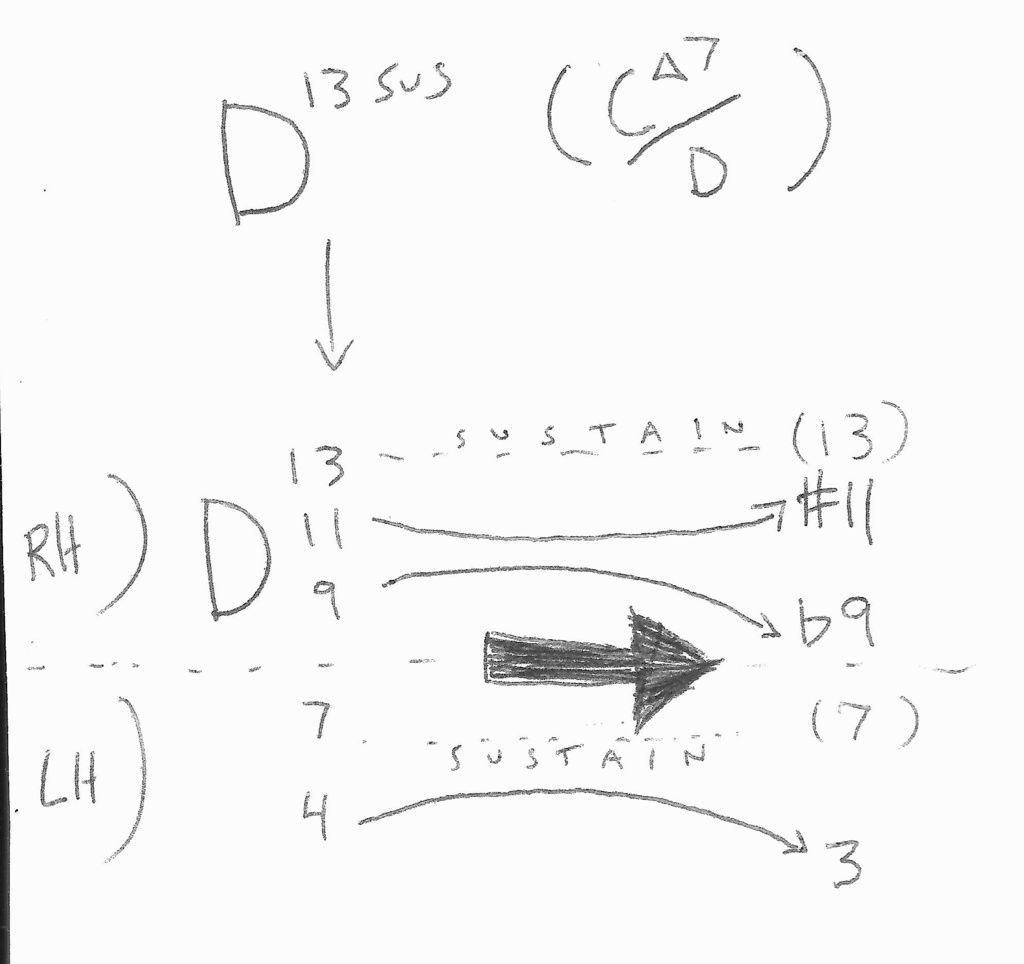 |
| Handwritten break-down of this shift. |
May your dominant chords be prolonged and extra-crunchy. Enjoy.
Thursday, June 11, 2015
Rhythmic Interplay Between Hands
Being a former drummer, I sometimes approach the piano with a bias toward rhythm. Instead of going crazy with harmony, my preference oftentimes is to explore the musical statements that can be made by breaking up a voicing into chunks and altering rhythm.
Let's look at this chromatically-descending set of chords to help illustrate how this might work. (Click images to enlarge. Click orange and white 'play' button below each example to listen.)
Since each chord-type is the same (and thus, the shapes of each chord are similar to one another), more attention can be given to the rhythms. I can break the chord into 3 'nodes' and play around with triplet rhythms:

OR, I can break the chord into 4 'nodes' to come up with busier 16th-note ideas:

To play these, my brain—I suspect—is thinking more as a drummer, in terms of "stickings" or drum rudiments, like diddles.
(E.g. Low bass clef notes followed by higher treble clef notes? Think L - R (left hand, right hand)
Two repeated notes? Think: diddle )
Listen to each variation and notice how each gives a slightly different musical effect. Play around with different interpolations of the chord/rhythms and see what you can come up with by thinking like a drummer!
For the full PDF of ideas contained in this post: Click here
Let's look at this chromatically-descending set of chords to help illustrate how this might work. (Click images to enlarge. Click orange and white 'play' button below each example to listen.)
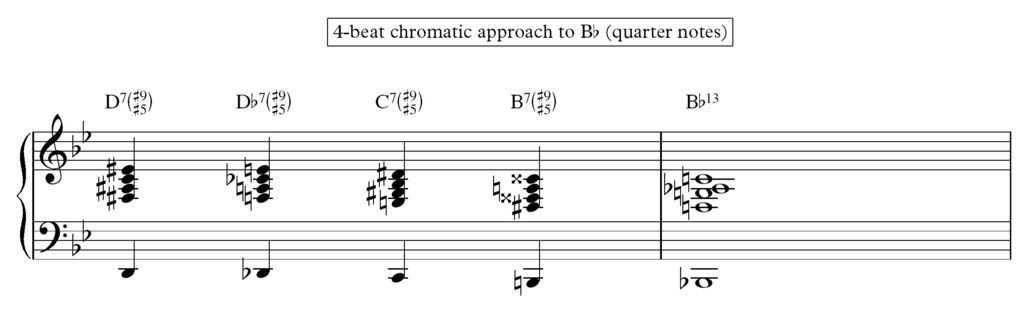 |
| Boring quarter notes = Potential for some rhythmic fun |
Since each chord-type is the same (and thus, the shapes of each chord are similar to one another), more attention can be given to the rhythms. I can break the chord into 3 'nodes' and play around with triplet rhythms:
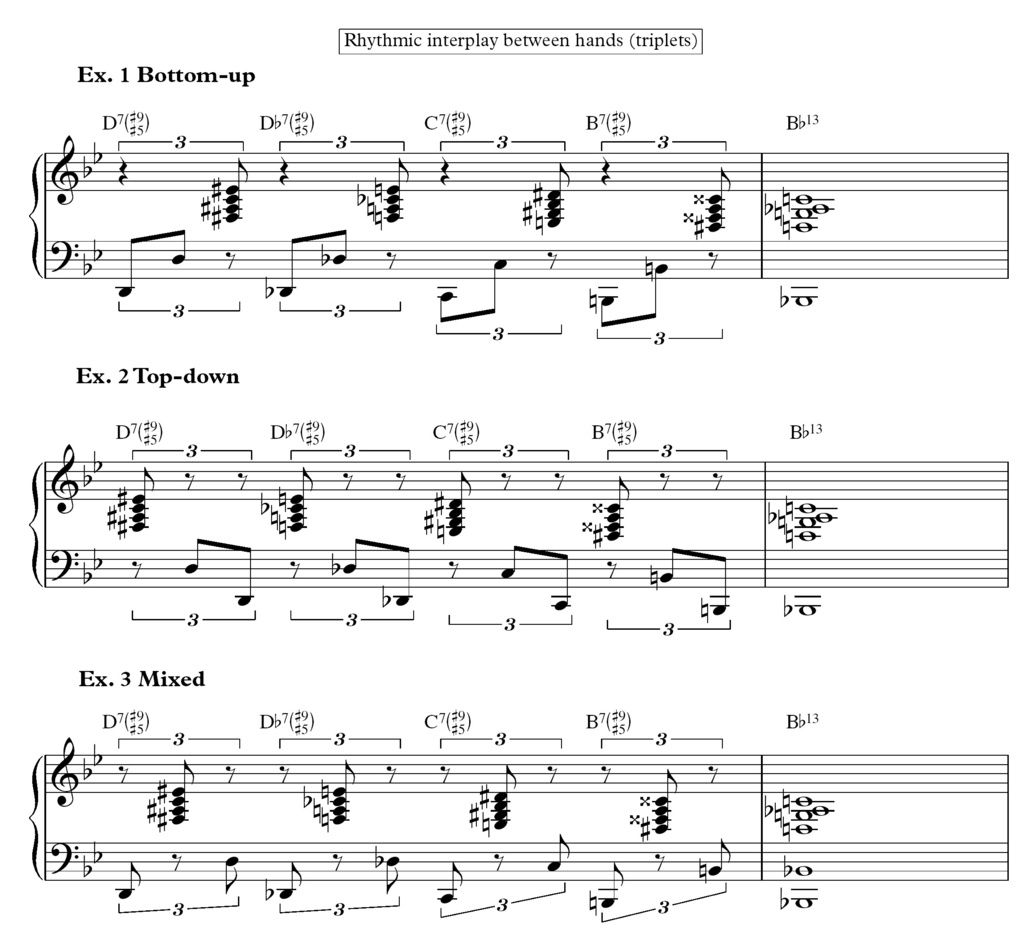
OR, I can break the chord into 4 'nodes' to come up with busier 16th-note ideas:
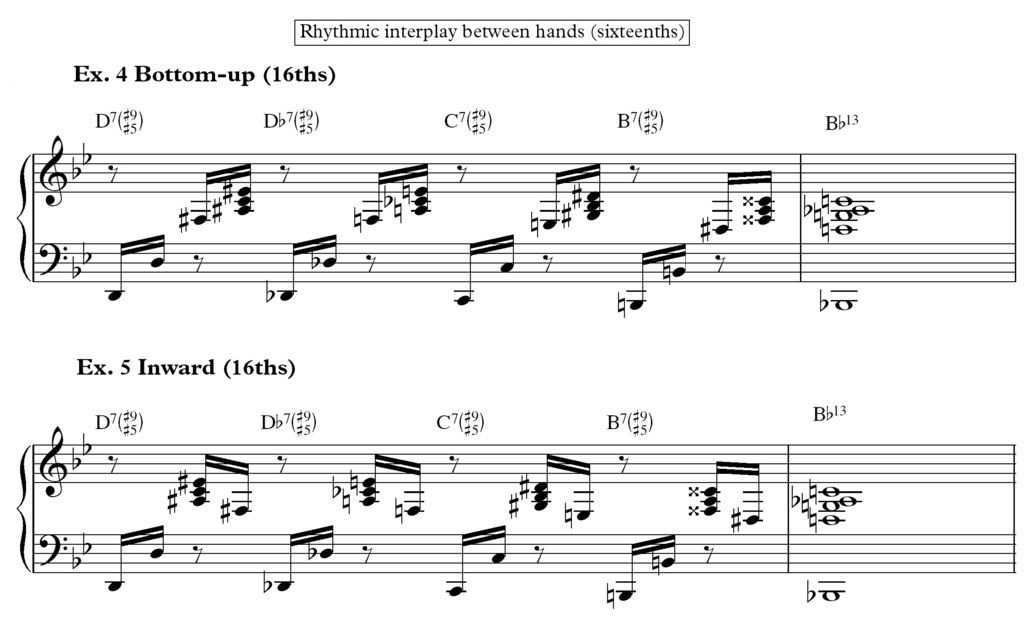
To play these, my brain—I suspect—is thinking more as a drummer, in terms of "stickings" or drum rudiments, like diddles.
(E.g. Low bass clef notes followed by higher treble clef notes? Think L - R (left hand, right hand)
Two repeated notes? Think: diddle )
Listen to each variation and notice how each gives a slightly different musical effect. Play around with different interpolations of the chord/rhythms and see what you can come up with by thinking like a drummer!
For the full PDF of ideas contained in this post: Click here
Thursday, April 23, 2015
Walking Bass Lines on the Piano - Rhythmic Concepts
A huge benefit a piano player enjoys is the ability to play several musical lines simultaneously. Therefore, in the jazz idiom, it's possible for one piano player to fulfill the roles of not only the melodic/harmonic instruments (typically with the right hand), but also the bassist (in the left hand).
In the following video, I focus in on these left hand bass lines. These lines serve as a strong harmonic and rhythmic foundation. In and of itself, too, a bass line constitutes its own independent melody. (The harmonic progression used in the video is a simple C blues—primary chords: C7, F7, and G7.)
Being an overall foundational component, bass lines are most often constructed with not much more than four well-placed notes per measure. That is to say, quarter notes are the rhythmic bread-and-butter of a sturdy bass line.
Once a strong quarter-note groove has been achieved, though, certain variations can be thrown into the mix in order to spice up the music and add a heightened sense of excitement/momentum to the groove. Here are some of the main rhythmic ideas that I demonstrate in the video:
In the following video, I focus in on these left hand bass lines. These lines serve as a strong harmonic and rhythmic foundation. In and of itself, too, a bass line constitutes its own independent melody. (The harmonic progression used in the video is a simple C blues—primary chords: C7, F7, and G7.)
Being an overall foundational component, bass lines are most often constructed with not much more than four well-placed notes per measure. That is to say, quarter notes are the rhythmic bread-and-butter of a sturdy bass line.
Once a strong quarter-note groove has been achieved, though, certain variations can be thrown into the mix in order to spice up the music and add a heightened sense of excitement/momentum to the groove. Here are some of the main rhythmic ideas that I demonstrate in the video:
- Instead of 4 quarter notes per bar, try using 6 quarter-note triplets to fill up a 4/4 measure.
- Experiment with different groupings of these 6 notes. (e.g. Two groups of 3 or Three groups of 2)
- Eighth note or eighth-note triplets can be played to propel the line toward a target note that you'd like to emphasize. (e.g. Eighth-note triplets preceding beat 4: "1, 2, 3-na-ne, 4")
- Once the RH joins in with your LH's bass line, experiment with placing faster right hand rhythms (triplets and sixteenth notes) atop the LH's quarter notes.
Tuesday, August 26, 2014
"Drop 2" Chord Voicing Technique
The "Drop 2" chord voicing technique is a common arranging/composing/piano trick. It's a great way to voice a chord for a horn section, or if you're a piano player, it's a slick way of creating strong 4- or 5-note voicings.
It's simple:
1) Start with a 4-note chord that exists all within an octave. (This may be a chord in root position, but may also be a different inversion of a chord, or some other type of cluster.)
2) Identify the second highest note (the "2" of "Drop 2").
3) Move this note down an octave.
That's it!
Here's a step-by-step video showing the process:
It's simple:
1) Start with a 4-note chord that exists all within an octave. (This may be a chord in root position, but may also be a different inversion of a chord, or some other type of cluster.)
2) Identify the second highest note (the "2" of "Drop 2").
3) Move this note down an octave.
That's it!
Here's a step-by-step video showing the process:
A Handful of Major Chord Voicings (with colorful illustrations) [Part 2 of 2]
In Part 1 of this series, the handful of major chord voicings was introduced along with an accompanying A/V example.
Now, in Part 2, each voicing will be colorfully broken down.
I will show each voicing notated on a grand staff, using a color-coded system. In the system, each scale degree (in these case of C major) is assigned a color, following the order of ROYGBIV. Since there are 7 notes in a scale, and 7 distinct colors in the visible light spectrum, this works out nicely. (This colorful choice of mine was inspired by this very interesting article about the link between Music and Color.)
*Please note that the people I attribute the following voicings to (and therefore the labels I assign each one), are by no means the originators of a particular voicing. Rather, they are the musicians/educators from whom I personally learned each voicing. (I will link to the relevant sources as we go along.)
1) Symmetrical "Martin" Cmaj13 (via Peter Martin)
2) "Tristano" Cmaj6/9 (a la Lennie Tristano)

3) Rootless "A Position" Quartal Voicing, Cmaj6/9 (via Earl MacDonald)

4) "B Position" Quartal Voicing, Cmaj13 (via Earl Macdonald)

5) "Drop 2" Cmaj9

Now, in Part 2, each voicing will be colorfully broken down.
Color-Coding Chord Tones
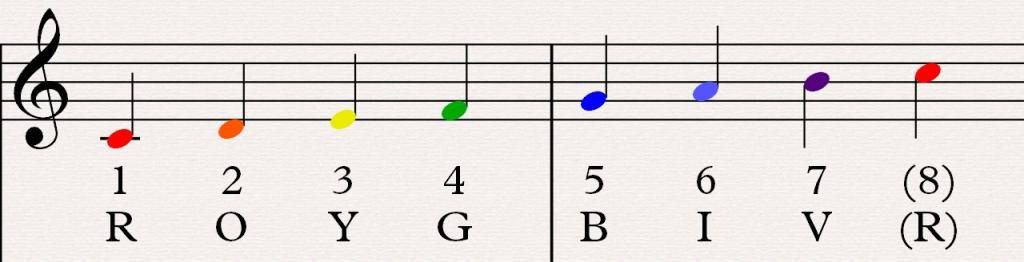 |
| C major scale, in colors. |
*Please note that the people I attribute the following voicings to (and therefore the labels I assign each one), are by no means the originators of a particular voicing. Rather, they are the musicians/educators from whom I personally learned each voicing. (I will link to the relevant sources as we go along.)
Five Colorful Voicings
- Symmetry in intervals: 3rd, 4th, 4th, 4th, 3rd
- Very similar to the next voicing (Tristano), but more colorful because it contains the 7th
- LH contains a minor chord in first inversion, RH contains a major chord in second inversion

2) "Tristano" Cmaj6/9 (a la Lennie Tristano)
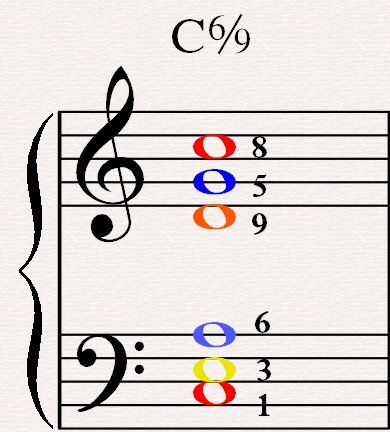
- Top four notes are spaced out by a 4th
- Root is doubled, appearing on the very bottom and top of the voicing
- Tristano often used this by "planing" this shape, moving it up or down chromatically
3) Rootless "A Position" Quartal Voicing, Cmaj6/9 (via Earl MacDonald)
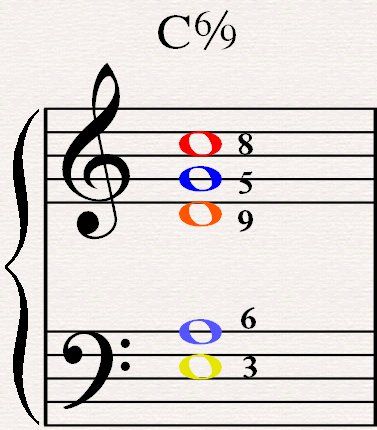
- 3rd on bottom (root on top)
- Basically the same as Tristano's voicing, but without the root doubled in the LH
4) "B Position" Quartal Voicing, Cmaj13 (via Earl Macdonald)
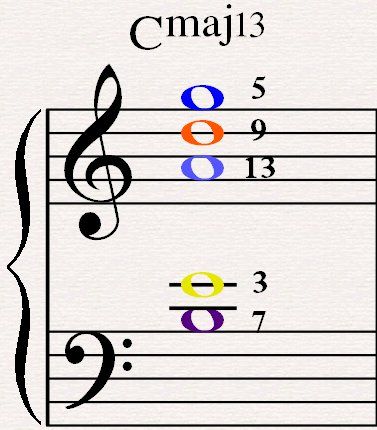
- 7th on bottom (5th on top)
- Rootless
5) "Drop 2" Cmaj9
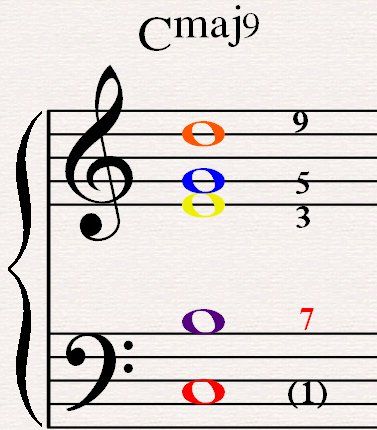
- Notes are not as evenly-spaced in this one (not as quartal as the others)
- The B (the 7th) was lowered by an octave
- To learn how to construct any voicing using the Drop 2 technique, click here.
Final Remarks
What to do with all of this information? If you happen to latch on to the sound/feel of one or two of these, take a second to figure it out on the piano. Divide the notes between hands however is most comfortable to you (in some 5-note cases, it may be preferable to put three notes in the LH, two in the RH, but you might prefer it the other way around). From there, continue around the Cycle of Fourths (or Fifths), constructing the voicing slowly and carefully.
Happy voicing!
A Handful of Major Chord Voicings (with colorful illustrations) [Part 1 of 2]
Prepare yourself to play some of these pretty chords. In general, they more-or-less all share the following characteristics:
- Mostly quartal (stacked in fourths)
- Contain extensions such as the 6th (13th) or 9th
- Relatively equal spacing between notes
- Sound really great
Here they are all together on one line of music, with an accompanying video (listen for the subtle differences between each voicing):
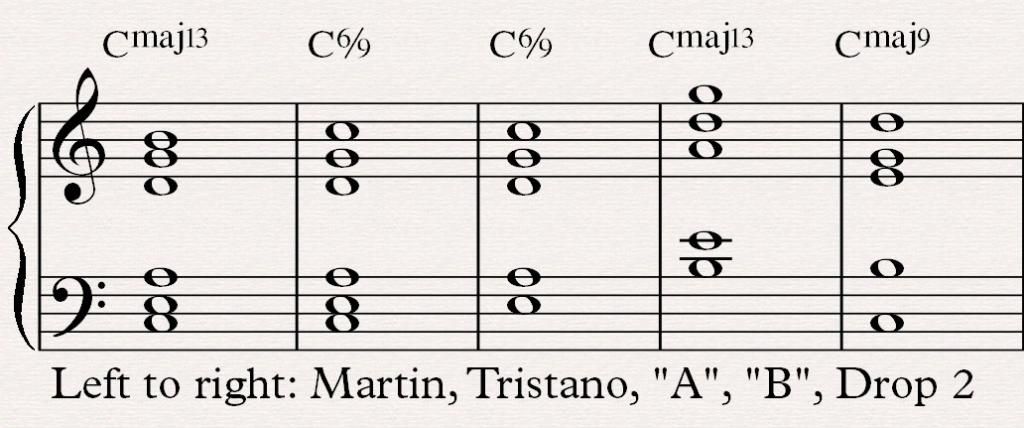 |
| (These labels I assigned each one will be explained in Part 2.) |
In the next installment [Part 2 of 2], I will show you how to construct each of these voicings.
Thursday, August 14, 2014
Seeing Intervals on a Staff
When I teach beginner-level piano students, one of the first things they learn is the "step" vs. "skip" concept. This coincides with their introduction to reading music from a staff. If a "line" note goes up to the adjacent "space" note, we call it a step (like stepping up on a flight of stairs). But if that line note goes up to a note on the next line above, we call it a skip (it is skipping the space between the lines). This is often how students begin their understanding of intervals. They soon learn that the line-space example is called a 2nd, and the line-line example is a 3rd.
Beyond 2nds and 3rds, of course, the intervals become larger, and perhaps can be a little trickier to identify on a staff. Fortunately, with a little practice, this becomes easier and easier, until soon enough it is second-nature.
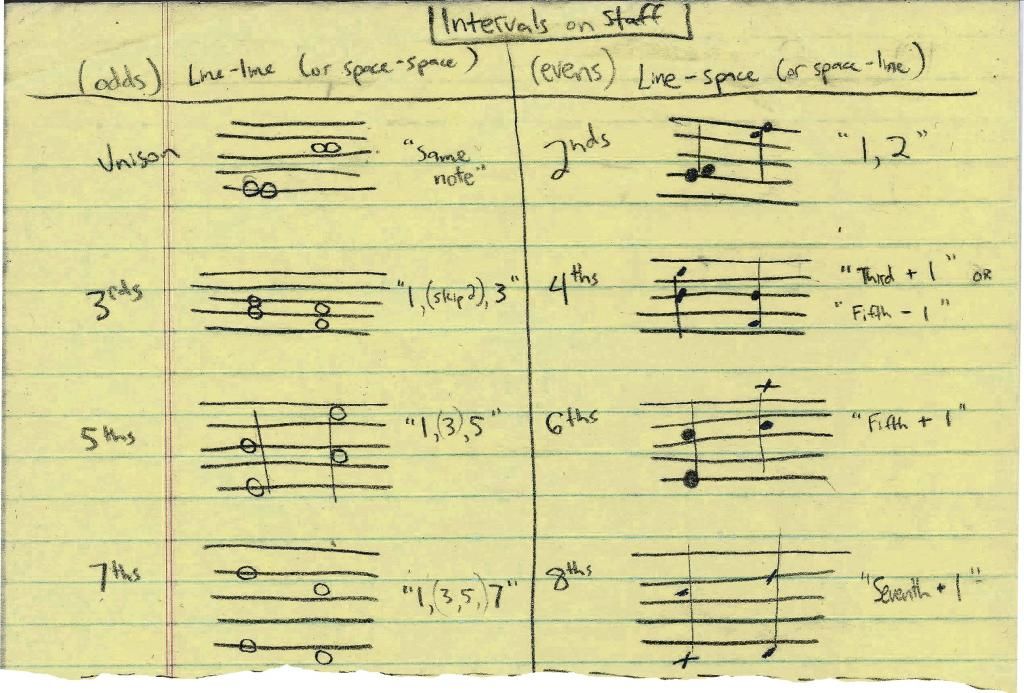
Here's a handwritten sheet showing what different intervals (unisons up to octaves) look like on the staff (5 lines, 4 spaces) The ability to quickly recognize an interval (and eventually, several intervals/chords at once) when reading from written music notation--especially when sight-reading--is very valuable.
In quotation marks, I wrote out simple mental steps someone might go through when looking at each interval. Visually, when I see a 7th, I like to imagine climbing up the rungs of a ladder (i.e. going from one line to the line above). On each rung, I can count up by odd numbers: "1, 3, 5, 7." A four-line ladder means I'm looking at a 7th.
The basic nugget of information to take-away from this post is this:
Intervals of Odd Numbers (1, 3, 5, 7) always appear as line-line or space-space.
Intervals of Even Numbers (2, 4, 6, 8) always appear as line-space or space-line.
To help visualize these intervals in another way (pianists especially), it would be a good idea to plunk out each of the intervals depicted above on a keyboard. Begin doing this in the key of C major (all white keys), and when comfortable try out some other keys in order to incorporate black keys into your visual memory bank.
Beyond 2nds and 3rds, of course, the intervals become larger, and perhaps can be a little trickier to identify on a staff. Fortunately, with a little practice, this becomes easier and easier, until soon enough it is second-nature.
Here's a handwritten sheet showing what different intervals (unisons up to octaves) look like on the staff (5 lines, 4 spaces) The ability to quickly recognize an interval (and eventually, several intervals/chords at once) when reading from written music notation--especially when sight-reading--is very valuable.
 |
| I hope my handwriting is legible for you. Click to enlarge. |
The basic nugget of information to take-away from this post is this:
Intervals of Odd Numbers (1, 3, 5, 7) always appear as line-line or space-space.
Intervals of Even Numbers (2, 4, 6, 8) always appear as line-space or space-line.
To help visualize these intervals in another way (pianists especially), it would be a good idea to plunk out each of the intervals depicted above on a keyboard. Begin doing this in the key of C major (all white keys), and when comfortable try out some other keys in order to incorporate black keys into your visual memory bank.
Thursday, February 20, 2014
Accompanying: 5 Quick Tips
Last weekend I spent a day at a local high school accompanying students at their district Solo & Ensemble Festival, and I spent the dozen-or-so days prior organizing and practicing the music. This year I accompanied for two schools instead of just one (as I have done in the past), so that meant more music to prepare and less time to do so. Keeping the following tips in mind definitely helped me successfully prepare for and participate in the festival this year, even with the time crunch.
For any of you who are at all familiar with S&E (either having had participated as a student musician, director, or accompanist), you'll know how the festival day can get to be rather long, exhausting, and perhaps stressful. Running around trying to make it to your performance sites in time, constantly penciling in time changes on the event schedule, scrambling to grab your instrument and find your accompanist (or in my case, your 'accompanee'), etc. —it can get pretty hectic.
So, in an effort to help any other accompanists out there, here's a list of a few things I've learned through my experiences with events like S&E.
Your accompanees will feed off of the energy around them. Keep a positive attitude, and the student musicians will likely follow suit.
Scheduling snafus, instrument malfunctions and the like are bound to arise. So prepare yourself for sudden changes in the day's plans, and be flexible.
For example, be prepared to play the Hummel Trumpet Concerto on a keyboard like this:
As in any performance, (of course) be musical. But specifically in regard to accompanying (oftentimes reading off of dense orchestral reductions or poor arrangements of pieces), you will find yourself having to make a fair amount of judgment calls, perhaps on-the-fly. E.g. which measures to cut from a score, which melodic line to play, how to re-establish a strong time feel if the performer falls out of time, and so on.
These are all common decisions that you may face throughout a day of accompanying student musicians, so be prepared to make these choices. Whenever possible, talk about these decisions with your accompanee, and make sure you are both on the same page. If faced with an extemporaneous choice, trust your own artistic tastes/ear to guide you, and execute the choice confidently.
Even if a performance experiences a hiccup or two, keep the music flowing and the time steady. This is again about making 'musical choices.' Above all, keep the heartbeat of the piece alive—it will keep your accompanee engaged in the performance, and the performance will benefit as a result.
For any of you who are at all familiar with S&E (either having had participated as a student musician, director, or accompanist), you'll know how the festival day can get to be rather long, exhausting, and perhaps stressful. Running around trying to make it to your performance sites in time, constantly penciling in time changes on the event schedule, scrambling to grab your instrument and find your accompanist (or in my case, your 'accompanee'), etc. —it can get pretty hectic.
So, in an effort to help any other accompanists out there, here's a list of a few things I've learned through my experiences with events like S&E.
1. Organization is key.
2. Exude confidence.
Your accompanees will feed off of the energy around them. Keep a positive attitude, and the student musicians will likely follow suit.
3. Roll with the punches; go with the flow.
Scheduling snafus, instrument malfunctions and the like are bound to arise. So prepare yourself for sudden changes in the day's plans, and be flexible.
For example, be prepared to play the Hummel Trumpet Concerto on a keyboard like this:
| Fortunately, this was just the warm-up piano, and a better (larger) instrument was at the performance site... |
4. Make musical choices.
As in any performance, (of course) be musical. But specifically in regard to accompanying (oftentimes reading off of dense orchestral reductions or poor arrangements of pieces), you will find yourself having to make a fair amount of judgment calls, perhaps on-the-fly. E.g. which measures to cut from a score, which melodic line to play, how to re-establish a strong time feel if the performer falls out of time, and so on.
These are all common decisions that you may face throughout a day of accompanying student musicians, so be prepared to make these choices. Whenever possible, talk about these decisions with your accompanee, and make sure you are both on the same page. If faced with an extemporaneous choice, trust your own artistic tastes/ear to guide you, and execute the choice confidently.
5. Power through.
Even if a performance experiences a hiccup or two, keep the music flowing and the time steady. This is again about making 'musical choices.' Above all, keep the heartbeat of the piece alive—it will keep your accompanee engaged in the performance, and the performance will benefit as a result.
Sunday, September 8, 2013
'A' Train Intro
Billy Strayhorn's composition "Take the 'A' Train" was the Duke Ellington orchestra's signature tune. The piece's introduction is instantly recognizable and prepares the listener for the rest of the classic composition.
Here's a transcription of the famous 4-bar intro (click to enlarge):

It is comprised of just two chords. The first chord is a second-inversion C major chord, and the second chord can be thought of as a first-inversion D9#11 (though it lacks the root). Using an enharmonic spelling, it could also be thought of as a third-inversion Ab7#5, but the D9 interpretation seems more fitting, if slightly incorrect, considering the D7#11 chords found later in the head.
These two chords are covered by the left hand, and the right hand plays melodically above. The right hand covers the span of a minor sixth, connecting E to the G# below with a glissando. The minor sixth is notable in that it is just a half step smaller than a major sixth, which is found in the first few notes of the tune's melody (G up to E). The introduction's minor sixth, in a sense, creates tension (as does the whole-tone color produced by the #11 chord), which is subsequently resolved on bar 1 of the head.
Have a listen to Duke Ellington and his orchestra playing 'A' Train (begins at 0:12):
Here's a transcription of the famous 4-bar intro (click to enlarge):
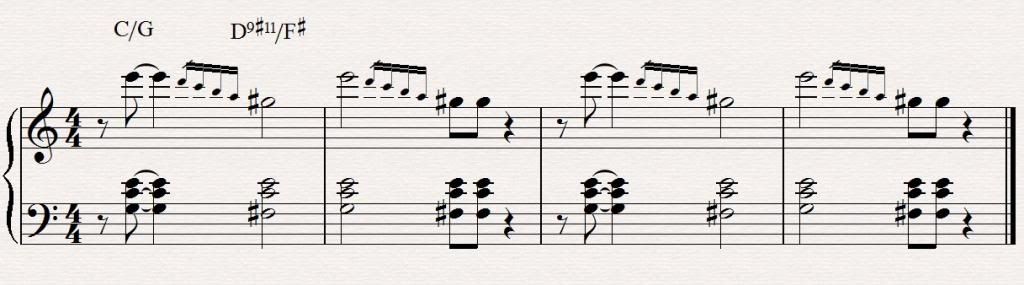
It is comprised of just two chords. The first chord is a second-inversion C major chord, and the second chord can be thought of as a first-inversion D9#11 (though it lacks the root). Using an enharmonic spelling, it could also be thought of as a third-inversion Ab7#5, but the D9 interpretation seems more fitting, if slightly incorrect, considering the D7#11 chords found later in the head.
These two chords are covered by the left hand, and the right hand plays melodically above. The right hand covers the span of a minor sixth, connecting E to the G# below with a glissando. The minor sixth is notable in that it is just a half step smaller than a major sixth, which is found in the first few notes of the tune's melody (G up to E). The introduction's minor sixth, in a sense, creates tension (as does the whole-tone color produced by the #11 chord), which is subsequently resolved on bar 1 of the head.
Have a listen to Duke Ellington and his orchestra playing 'A' Train (begins at 0:12):
Saturday, March 30, 2013
Jazz Vocab: Beethoven figure
This is the first of what I intend to be many "Jazz Vocabulary" posts. We're kicking it off with some Ludwig van Beethoven. I played his Sonata No. 16 in G Major, Op. 31 (Movement 1) last spring, and within the piece, there is a recurring melodic idea (first stated in the key of G major) that works well as a jazz pattern.
The Figure
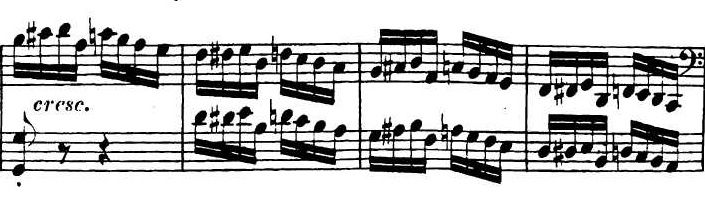
Here's how it appears in the sonata, in the key of G Major:
I liked the shape of this line so much that I decided to integrate it into my jazz vocabulary. It's easy to construct and figure out in any key: It begins on the tonic, approaches the major third by a half step, encloses the tonic, moves stepwise down to the 5th of the scale, continues to the 6th with a chromatic passing tone, encloses the 4th, then continues down stepwise until making it "home" to the tonic.
Applying the Figure
It can be used over major chords, and is easily repeatable (as Beethoven demonstrates in his sonata), given you are using a proper fingering. For instance in the key of G, I make sure my thumb is landing on the root (G) and the fifth (D) of the scale. This ensures that the fingers are in position to repeat the pattern for the next octave below.
Practicing the Figure
Take this pattern around the circle of fifths all 12 major keys. You'll find that slightly different fingerings will be necessary for each key, but the adjustments are only minor. Many keys may use identical fingerings for this pattern. To get you started, I created a sheet with the pattern in the keys of C, F, Bb, and Eb. At the end of the sheet, I also included the pattern in the original key of G major. Fingerings have been included, but they are only suggestions, as your fingers might prefer something else.
Video
In this video, I play the pattern first in C major a few times, then I continue to take it around the cycle, as per the sheet.
Links
Download the worksheet: Beethoven Worksheet
Watch the video again: Watch again
The Figure
Here's how it appears in the sonata, in the key of G Major:
 |
| (RH: treble clef, LH: bass clef) |
I liked the shape of this line so much that I decided to integrate it into my jazz vocabulary. It's easy to construct and figure out in any key: It begins on the tonic, approaches the major third by a half step, encloses the tonic, moves stepwise down to the 5th of the scale, continues to the 6th with a chromatic passing tone, encloses the 4th, then continues down stepwise until making it "home" to the tonic.
Applying the Figure
It can be used over major chords, and is easily repeatable (as Beethoven demonstrates in his sonata), given you are using a proper fingering. For instance in the key of G, I make sure my thumb is landing on the root (G) and the fifth (D) of the scale. This ensures that the fingers are in position to repeat the pattern for the next octave below.
Practicing the Figure
Take this pattern around the circle of fifths all 12 major keys. You'll find that slightly different fingerings will be necessary for each key, but the adjustments are only minor. Many keys may use identical fingerings for this pattern. To get you started, I created a sheet with the pattern in the keys of C, F, Bb, and Eb. At the end of the sheet, I also included the pattern in the original key of G major. Fingerings have been included, but they are only suggestions, as your fingers might prefer something else.
Video
In this video, I play the pattern first in C major a few times, then I continue to take it around the cycle, as per the sheet.
Links
Download the worksheet: Beethoven Worksheet
Watch the video again: Watch again
Subscribe to:
Posts (Atom)
